You’ve decided to try sautéing vegetables without oil. A brilliant move for your health! But you’ve run into a bit of a snag, haven’t you? Instead of the sizzling, beautifully browned, and flavour-packed veg you dreamed of, you’re looking at a rather sad, pale, and soggy pile that feels more… boiled. I know the feeling. When I first tried it, I ended up with what I can only describe as a watery mess. It’s a common story, but I promise you, it doesn’t have to be your story. Sautéing without oil isn’t about just taking the oil out; it’s about learning a new, simple, and incredibly rewarding technique. Stick with me, and I’ll show you how to transform your vegetables from bland and steamy to absolutely brilliant. We’ll get this right, together.
First Things First, Why Bother Sautéing Without Oil?
Let’s get this out of the way. The main reason most of us venture into the world of oil-free sautéing is for our health. It might be to reduce overall calorie density, manage a specific health condition, or simply to move towards a more whole-food, plant-based way of eating. All fantastic reasons.
But here’s the secret bonus, the thing that will keep you doing it long after the novelty wears off: flavour. When you remove the oil, you stop coating your vegetables in a layer of fat. Instead, you create the perfect conditions for the vegetables’ own natural sugars and unique tastes to come forward and take centre stage. You’ll start tasting your carrots in a way you never have before. The earthy depth of a mushroom will seem richer, the sweetness of an onion more profound.
The key is to adjust your expectations. This isn’t a like-for-like replacement for oil; it’s a completely different culinary skill. My “aha!” moment came when I stopped trying to mimic frying and started to embrace this new method of building flavour from the ground up. It’s a bit of a dance between wet and dry, steam and sizzle, and once you get the rhythm, it’s truly wonderful.
Your New Best Mates: The Liquids That Replace Oil
Your frying pan’s new best friend is no longer a bottle of oil, but a small jug of liquid. The type of liquid you choose has a huge impact on the final dish. Let’s break down the most common choices.
- Water: This is your baseline, the neutral choice. It’s free, it’s always on hand, and it does the fundamental job of preventing sticking and helping to cook the veg. The downside? It adds zero flavour. Use water when you want the pure, unadulterated taste of the vegetables to be the absolute star, or when your dish already has a lot of other powerful flavours going on.
- Vegetable Broth/Stock: This is my go-to. A good vegetable broth is like a secret weapon for flavour. It adds a savoury, aromatic depth that water just can’t compete with. It coaxes out the vegetables’ sweetness and seasons them from the inside out. My top tip here is to always opt for a low-sodium version. This gives you control over the saltiness of the final dish.
- A Splash of Wine or Vinegar: Now we’re getting fancy! A splash of white wine, red wine, or even something like balsamic or cider vinegar is perfect for a technique called ‘deglazing’ (which we’ll cover in a moment). The acidity provides a bright, sharp kick that can lift an entire dish. Use this when you want to add a bit of gourmet complexity.
- Soy Sauce/Tamari/Liquid Aminos: For an umami-rich, savoury explosion, these are your guys. A little goes a long way, and they are fantastic for any Asian-inspired stir-fry. The only things to watch for are the high salt content and the fact that the sugars in them can burn more quickly, so use them carefully.
| Liquid | Flavour Profile | Best For |
|---|---|---|
| Water | Neutral | All-purpose, when other flavours are strong |
| Broth/Stock | Savoury, Aromatic | Building a deep flavour base for any dish |
| Wine/Vinegar | Acidic, Bright | Deglazing, adding a ‘gourmet’ touch |
| Soy Sauce etc. | Salty, Umami | Asian-style dishes, adding intense savouriness |
The Foolproof, Step-by-Step Guide to Oil-Free Sautéing
Right, class is in session! Forget everything you think you know about sautéing. Grab your apron, and let’s walk through this together. It’s all about the technique.
Step 1: The Right Kit
Success starts with the right tools. A good quality non-stick pan will make your life infinitely easier when you’re starting out. If you’re a dab hand with a stainless steel pan, that works brilliantly too, but it’s less forgiving. The other crucial item is your liquid of choice, ready and waiting in a small jug or bowl right by the hob. You need to be able to grab it quickly.
Step 2: Get a (Dry) Sizzle On
This is perhaps the most important step. Place your empty, dry pan on the hob over a medium-high heat. Let it get properly hot before you even think about adding food. How do you know when it’s ready? The classic chef’s trick is the water drop test. Flick a tiny droplet of water into the pan. If it sizzles and evaporates immediately, you’re nearly there. If it forms a little ball that dances across the surface, you’ve hit the jackpot. The pan is perfectly heated.
Step 3: Add Your Aromatics
Time for the flavour-makers. Add your chopped onions, shallots, or celery to the hot, dry pan. They should sizzle immediately. Keep them moving with a wooden spoon or spatula. They will start to release their moisture and soften. Now, a word of warning from a man who has made the mistake more times than I care to admit: if you’re using garlic, don’t add it just yet! Minced garlic burns in a heartbeat in a dry pan. I’ve learned that the hard way, creating a bitter, acrid taste that ruins the dish. We’ll add it in the next step.
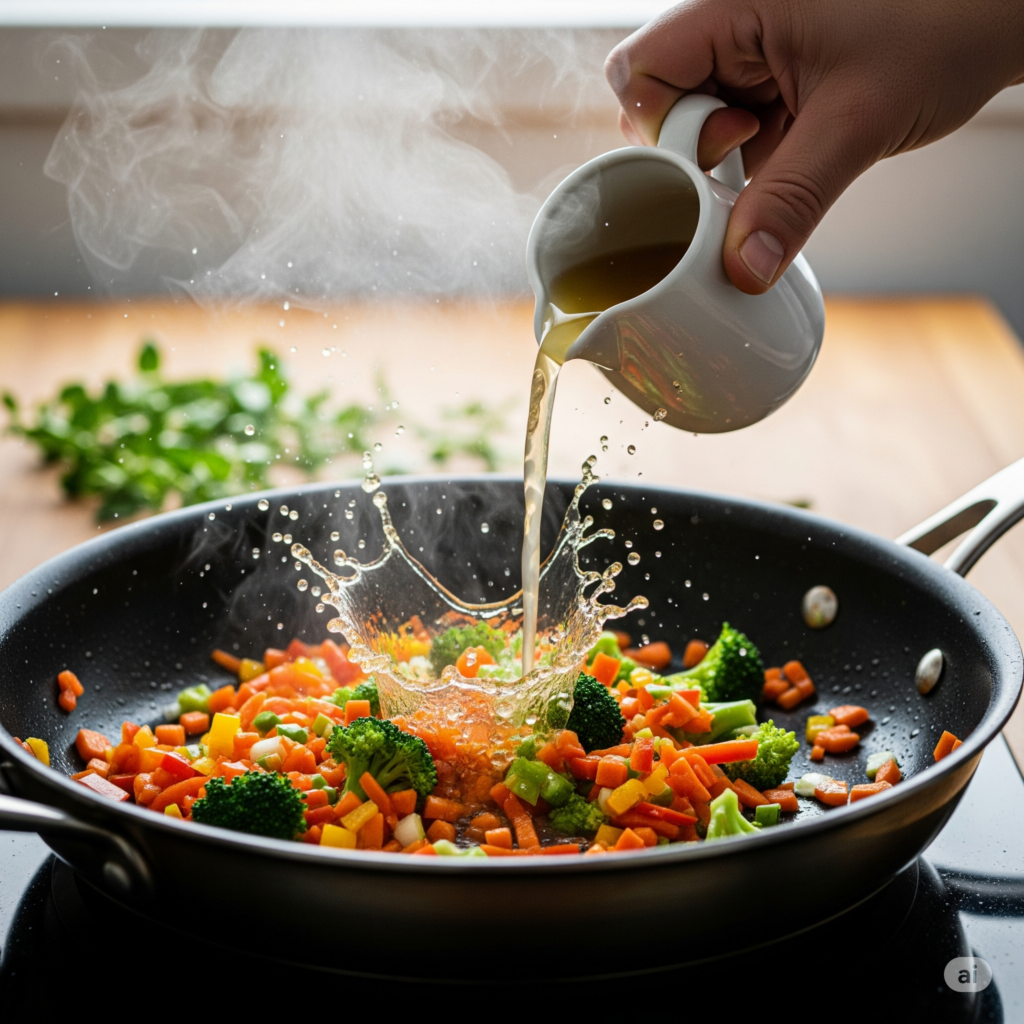
Step 4: The First Splash
After a minute or two, your onions will start to look a little dry and may begin to stick. This is the moment of truth. Grab your liquid and add just a splash – about one or two tablespoons. It should hit the hot pan and erupt in a glorious sizzle. This is the sound of success! Use your spatula to stir everything around. Now is the perfect time to add that garlic, as it can cook in the liquid without burning.
Step 5: The Main Event – Adding Your Veg
Once your onions are soft and fragrant, it’s time to add the rest of your vegetables. A key tip is to add them in order of how long they take to cook. Hard vegetables like diced carrots, broccoli stems, and peppers go in first. Give them a few minutes of cooking, adding a splash more liquid whenever the pan gets dry.
Step 6: The Deglazing Magic
As you cook, you’ll notice lovely brown bits starting to form and stick to the bottom of the pan. This isn’t a disaster; it’s gold! This is called ‘fond’, and it’s packed with concentrated flavour. The final, crucial step is to ‘deglaze’ the pan. Add a slightly more generous splash of liquid (this is where wine or vinegar really shines) and use your spatula to scrape all those brown bits off the bottom. They will dissolve into the liquid, creating an instant, deeply flavourful pan sauce that coats all your vegetables. This is the single biggest secret to making oil-free sautéed vegetables taste amazing.
From Soggy to Superb: Troubleshooting Common Mishaps
Even the best of us have off days in the kitchen. If your dish isn’t turning out quite right, don’t panic. Let’s diagnose the problem.
- Problem 1: “My vegetables are pale and steamed.”
This is the most common complaint. The cause is usually too much liquid and not enough heat. Solution: Make sure your pan is properly hot before you start. Don’t overcrowd the pan, as this lowers the temperature and causes steaming. Most importantly, use less liquid. Let the pan get completely dry and allow the veg to sizzle for 30-60 seconds before adding your next tiny splash. - Problem 2: “Everything is sticking and burning!”
The opposite problem! This often happens if the pan wasn’t hot enough to begin with, causing the food to bond to the surface before it could form a crust. Solution: Be patient and let that pan heat up properly! Also, ensure you’re adding your splash of liquid the second things start to stick. Don’t wait until they’re welded on. Keep everything moving. - Problem 3: “They’re just… bland.”
Ah, the flavour failure. Solution: You probably skipped the deglazing step! All the flavour is in those brown bits at the bottom of the pan. Scrape them up! Also, consider using a more flavourful liquid like broth instead of water, and don’t forget to season generously with salt, pepper, herbs, and spices at the end of cooking. - Problem 4: “They’re cooked, but not brown.”
You’re after that beautiful caramelisation, the result of the Maillard reaction. This reaction requires a dry surface to work its magic. Solution: Patience is key. After a splash of liquid has almost fully evaporated, let the vegetables sit, undisturbed, on the hot surface of the pan for a minute. This direct contact with the dry heat is what encourages browning. Then stir and, if needed, deglaze again.
Know Your Veg: A Quick Cheat Sheet
Not all vegetables are created equal in the world of oil-free sautéing. Here’s a quick guide.
- The Sponges (Mushrooms, Aubergine): These will soak up any liquid you give them. You can either ‘dry sauté’ them first in a hot pan until they release their own water and start to brown, then proceed with your aromatics and splashes of liquid. Or, just be prepared with a bit more broth than usual.
- The Hard Lads (Carrots, Broccoli Stems, Peppers): These chaps need a bit more time and steam to soften up. Cut them into smaller, uniform pieces so they cook evenly. Don’t be afraid to add a splash of liquid and pop a lid on the pan for a minute or two to trap the steam and speed up the process.
- The Leafy Greens (Spinach, Kale, Chard): These contain a lot of water and wilt incredibly fast. They should always be the last thing you add to the pan. They often need little to no extra liquid; the residual moisture in the pan is usually enough.
- The Aromatics (Onions, Garlic): The foundation of it all. The goal is to get them soft, sweet, and translucent without turning them into mush. A medium heat and careful additions of liquid are all you need.
Frequently Asked Questions (The Quick-Fire Round)
- Can I get my vegetables crispy this way?
Let’s be honest: that deep-fried, shatteringly crisp texture is a product of hot oil. With this method, you can achieve beautifully browned, flavourful, and tender-crisp vegetables, but “crispy” in the chip-like sense is not the goal. - What’s the best pan for sautéing without oil?
For beginners, a good non-stick pan is the kindest option. It provides a safety net against sticking as you learn the technique. - Does this method take longer than using oil?
Yes, slightly. You’re building flavour in a more deliberate, gradual way rather than flash-frying in hot fat. The extra 5-10 minutes is well worth it for the incredible taste. - Can I still caramelise onions without oil?
Absolutely! It just requires patience. Use a low heat and add tiny splashes of water or broth over a longer period (20-30 minutes). The onions will slowly break down, release their sugars, and turn beautifully sweet and golden brown.
And there we have it! You’re now armed with the know-how to sauté vegetables without a drop of oil, and more importantly, how to make them taste fantastic. See? It wasn’t so scary. The secret isn’t in a magic pan or a fancy ingredient; it’s in the technique. It’s about understanding the role of heat, the splash of liquid, and the magic of that brown ‘fond’ at the bottom of the pan. The next time you’re in the kitchen, I want you to feel confident, not hesitant. Grab your pan, chop your veg, and give it a go. You’ll be amazed at how much pure, unadulterated flavour you can unleash. Happy cooking!